Showing posts with label Merriest Wishes. Show all posts

Monday, 29 November 2021

Sweet Little Stockings For JAI #582


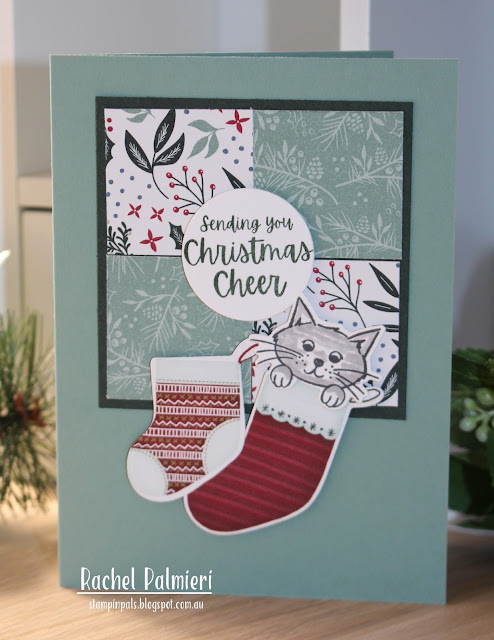
This morning I was finishing off some Christmas cards, and I thought that I would seek a little inspiration. I have been making up some one-sheet-wonder cards , and they just needed "a little something" to lift them up.

The JAI #582 picture inspired me to use the stockings I have already die cut, and they can be fussy cut too from the Sweet Stockings DSP. 


The scrolling font on the blackboard reminded me of the sentiments in Merriest Moments and although this stamp is retiring at the end of the mini catalogue (3 Jan) its such a classic with holly, mistletoe and poinsettia, I probably will hold onto mine.


These cards will be perfect for my friends with pets I think and just a heads-up, Sweet Little Stockings stamp and Stockings Dies are available at a BIG saving if purchased separately on December 1st. 


I'm almost finished making cards now, are you? Then the massive task of writing them begins. Do you hand write a message in each?
PAT6J27R


Your orders are very much appreciated, no matter how small or big, every little bit helps me to meet my minimums, and keep on creating. Hopefully you are inspired by some of the projects I share, and want to make your own. My online shop is open anytime and delivery by tracked Australia Post takes 5-10 days.


Product List

Thursday, 24 November 2016

It's Beginning To Look A Lot Like Christmas AWH Bloghop


Today some of the Art With Heart Stampin' Up!® team have created some amazing Christmas projects to inspire you with the theme, "It's Beginning To Look A Lot Like Christmas!" We have tags, gift bags, teacher gift ideas, decorations and many more fun projects to create this holiday season.


To begin, I'm sharing this gift box, which I used to hold a gift for my Onstage room mate, Kathryn Mangelsdorf. Merriest Wishes was put to good use on this gift box, with simple stamping of the graduated spots all around, just in Smokey Slate. I had to put it aside and leave it to dry, as the box is so shiny it takes a while to set. There is an acetate sleeve included with these white boxes, which I tied a piece of the  silver ribbon around, to attach the tag. 


My chosen colours for the decorations were Emerald Envy and Real Red, and I cut one of each in the various dies in Merriest Tags Framelit Dies, that co-ordinate with the Merriest Wishes stamp set. Eight of these folded tags fit comfortably in this box, you could probably fit ten without any problems.


Using thick whisper white, I cut the cards 14cm by 7cm and managed to get quite a few from each sheet. Simply score at 7cm and you have a perfect square tag.


This year I was determined to get on top of the Christmas cards early, and surprisingly, considering how busy life has been these last few months, I think I've done it!!! My secret is mini-mass production, and if you think that sounds like a contradiction, I'll explain. 

Once the design has developed in my mind, I've endeavoured to make multiples. Ten or twelve is a good number to aim for, because once you've sorted the measurements you're already half-way there.


These Christmas cards are almost the same with some colour changes, but all the patterned paper was cut from Presents and Pinecones designer series paper, at the one time, so I kept repeating the dimensions (easy to remember that way). For the card above I chose to use the Jar Of Cheer with the sentiment stamped on the jar.


This card was even easier as I had the banners and trees already cut from another set of cards I made. Peaceful Pines and Banners For Christmas are the stamp sets for this.


Here we see Merriest Wishes back again, this lacy bauble is my absolute favourite. I have made good use of this set, it's a favourite for sure.

Recipe
Card Base - cut a sheet of A4 lengthwise at 10.5cm, score at 15cm
First layer - Fancy Frost SDSP (30% off 21-28 November) cut 10cm x 14.5cm
Second layer - 8.5cm x 13 cm
Third layer  -  DSP cut at 8cm x 12.5cm

Next, have a session of gluing. My choice for this is the Tombow Multi-purpose Liquid Glue, mainly for the way it gives a little leeway to line papers up evenly.
Lastly, decide on the embellishments you're using.
Easy-peasy?

If you find a broken link or have come to this blog hop from a different entry point, you can view the participants below:
  1. Rebecca Jacovou
  2. Ros Davidson
  3. Kathryn Ruddick
  4. Kate Morgan
  5. Rachel Palmieri
  6. Claire Daly
  7. Mary Kelly
  8. Monika O'Neill
  9. Tina Gillespie
  10. Kathryn Mangelsdorf
  11. Catherine Proctor
  12. Judy May

 So now you are leaving me, Rachel Palmieri, and heading over to the awesome Claire Daly

Cheers, Rachel

Sunday, 9 October 2016

Holiday Tags CTC#99


Apparently Christmas is fast approaching! All I can say is, "Thank goodness we don't have to celebrate Halloween and Thanksgiving in Australia, or there just wouldn't be enough time to fit Christmas in!!! We are having a VERY long school term in Victoria: 11 weeks and 2 days, when the optimum time is meant to be 10 weeks. It won't only be the teaching staff that are tired and towie, the kids will be uncontrollable by the last few weeks.

You may have just hopped from my friend Kathryn's blog, but if you started here with me, make sure you go full circle for your weekly dose of inspiration. This week at CASE-ing The Catty we are focusing on some tags. I took a look through the holiday catalogue, and decided that tags made with the jar stamps and framelits would be super cute.


After cutting a couple of strips of extra thick Whisper White card, I stamped the jar shape from Jar Of Cheer. There are now three different stamp sets that co-ordinate with the Jar Framelits. The first one was Jar of Love in the Annual catalogue, Jar of Cheer and Jar of Haunts in the Holiday Catalogue. You can still save 10% if you bundle and save the Jar of Love stamps with Everyday Jars Framelits. 


Once the jars were die cut, I began stamping out the sentiment. Next, it was time to tackle the lids and so far I have made them with the Gold and Bronze foil paper, and I think silver may just get a look in too. I CASE-d the jar from the Christmas card on page 25 of the Holiday Catalogue, but I don't have the Pretty Pines framelits, so I improvised and used a small leaf from Jar of Love.


If you take another look at the top picture, you'll see that to and from is stamped on the back. This stamp is a handy little one from Merriest Wishes. The tags are finished off with a bow tied in Cherry Cobbler Bakers Twine. This comes packaged with a roll of Garden Green and Gold, so there is plenty of variety for all your Christmas crafting. If you'd like to shop for some crafting goodies, my online shop is open for you all day, everyday and when you use the Hostess code before checkout, (M7F6343W) you'll receive a little something from me in the post too.


We love it when you share your projects with us at CASE-ing the Catty. Just link up here.

Now it is time to hop along to see what clever Kelly  has shared on her blog.


Cheers, Rachel

Sunday, 25 September 2016

Favourite Holiday Bundle CTC #97


Welcome back to another CASE-ing The Catty Blog Hop. You may have just 'hopped across the ditch" from Jackie Noble, or perhaps you are starting here with me in Melbourne. Whichever it is, please make sure you complete the circle to see what the team have shared. This week the design team at Caseing the Catty are CASEing their favourite Holiday Bundle. That's a difficult one, with so many great bundles in this Stampin' Up! Holiday Catalogue.
Stampin' Up! catalogue sample

In the end I decided to feature Merriest Wishes on page 21 of the catalogue. My October classes will feature three different Christmas cards using three different stamp sets, and this will be one of them.


The layout of this card is perfect, and I just substituted some Candy Cane Lane DSP (patterned paper) for the background. After cutting a number of different tags with the Big Shot, I chose three main ones and a mini bauble to place on the card. I totally stole the idea to stamp the sentiment on a white bauble, straight out of the catalogue. and added some sponging around the outside, along with splatters from the Wink of Stella Gold {love this}. The gold foil tree has been backed with Chocolate Chip and that bauble with the intricate edging would have to be my favourite from this set.


I'm just a little bit excited by the fact that these jars I bought at a TYPO factory outlet are an exact match for Emerald Envy. this week an order with the 3 bakers twine including gold, arrived. That's it tied around the neck of the jar.I really wish I had waited to use that on the card too, as the fine gold thread has ended up almost invisible. The ladies at class will get to use the thicker gold twine on their cards though.

Do you want to join in our challenge this month? You'll find the link below if you do.


Now it is time to leave me, Rachel Palmieri, and continue the hop. You are off to visit with Judy, and I bet she has something super to share.


Cheers, Rachel